Sunday, June 6, 2010

Care and Handling of Laptops

The Apple laptops we have purchased to go with the Promethean Activboards are base model machines with the maximum memory. This is the start of a series of posts about the care and handling of the laptops. The posts will define common terminology and specific details about what to do, what not to do, and why.

Water, and Liquids, and Electricity - Oh My!
First and foremost, the computer is a sensitive electronic device. In total, each machine cost $1,309.90. We purchase a three year Apple Care Protection Plan. This serves as a safety net for parts that break. It does not cover accidental damage.


About a week and a half ago, a bottle of water was near one of the new machines and a child bumped the cart and the water spilled on the keyboard. It was toweled off immediately, but the damage was already done. As the water came in contact with the electronics under the keyboard, strange things started happening. The machine started turning on and off. Next the computer wanted a password to turn on, but the password was not being accepted. Finally, the computer refused to charge and turn on.


It was taken to the Apple store. The story was told in full and thankfully - rewarded. Close to $800 in damage occurred due to the water, but they are repairing it under the protection plan. This is not always the case!


Rule Number One
Please keep all liquids far from all the electronic equipment. It's so easy to think that you'll just take a sip, but in the classroom there are many distractions. All it takes is one bump and the machine is out of service. This applies at home and at school. It applies to transporting the machine to and from school, as well. Many years ago, a bottle of Windex with a loose top spilled on a laptop. It was no longer under the plan coverage and had to be disposed. It cost more to fix the machine than its value.


Will the Machine Come Back the Same?
The machine will come back next Friday. Depending upon where the spill occurred, it may have shorted out the hard drive. This leads to the question: What is a hard drive, anyway?


A hard drive is a part in the computer that saves your files. In a previous post, you learned about the transparencies that were scanned into the computer. Each transparency becomes a computer file in the scanning process. In an upcoming post, there will be a discussion about a concentration matching game to practice vocabulary. The original game was modified and saved with the words for the classroom. I have a copy of the original game, but the hard drive of the effected machine was the only one with the words for the classroom. Depending upon how much work was done, each game created becomes its own file. One file might have words about food. Another file might have words about items you would find in a house. Each file represents hours of work.


If we are lucky, the hard drive is fine. If not, those transparancies will have to be scanned again and those games will have to be recreated with the vocabulary words.


How Could Those Lost Hours Be Prevented?
In the lessons I've been teaching so far, we have not reviewed the concept of backing up files. When you back up a file, it makes an exact copy in another location. There are a few methods.


1) Save a copy on the school's file server (*more in a future post)
2) Create a CD or DVD with the files
3) Save the files on a memory stick (also called a flash drive - see image above)


I'm sure this will be one of the first new lessons when the machine returns to the school.


Here is a Hard Drive
The photo on the right shows an open hard drive. In its natural state, you would never see a hard drive open like it is in the photo. That is because it is an incredibly sensitive piece of equipment. 

The platter is like an old vinyl record. It is more sensitive in many ways. It is always enclosed to prevent dust from touching the surface. As the arm moves over the surface of the platter, it reads and writes information. A piece of dust is like a boulder under the arm.


How Else Can a Hard Drive Be Damaged
Dropping the computer, even a short distance, can cause the arm to bounce on the surface of the disk and cause damage. Depending upon where the arm hits the platter, it may cause enough damage so that they disk will not work again.


The disk not only holds your files, but the entire set of programs that makes the computer a computer. One program is the operating system. The operating system is what gives us the icons on the desktop and the programs we run, for example, the program that lets us use the Internet (Safari). In short, it makes the computer "the computer". 


When you first power on the computer, it goes to the boot record. Imagine the boot record as a unique spot on the platter that tells the computer what to do next. If the arm falls on the platter on the boot record, you cannot read anything else on the platter. 


Oh My Gosh, I'm Going to Break It
No...you're not! All this being said, the computer is not so delicate you should be in constant fear of breaking it. Just realize that it is an electronic device that cost a good bit of money. Keep liquids away. Always place it on a level surface. Keep it away from the edge of the table. Relax and enjoy it! 


Image Citation:
Wood, Gary J. "Disassembled Hard Drive." gary j wood's photostream. 22 Jun 2006. 6 June 2010.
http://www.flickr.com/photos/garyjwood/172810124/

Additional photos by Ann Oro.

Sunday, May 16, 2010

Moving from Transparencies to Computer

One insight last week was the need to transition older "technologies" to the computer - if only to conserve space and the need to juggle equipment. One such technology is overhead transparencies.

Meet the Scanner
We have one scanner in the school. It is a Canon 4400f model.We use CanoScan Toolbox 5.0 software to work with the scanner from a computer. 

First, the scanner's USB cable must be plugged into the mouse port and the computer must have the Toolbox software loaded. Open the top of the scanner, like a photocopy machine, and place the transparency face down on the glass pane. Close the lid over the transparency. It is a good idea to line the image against the left or right side of the scanner so the image is straight when it is scanned.


Scanner USB Cable

Start the Software

The name of the MacBook program in use is always in bold to the right of the apple on the top of the screen. The program name should be Finder when you are not in a program like Safari. If you do not see the word Finder, click the desktop once. On the Finder menu, look for and click on the word Go. This is a list of places you can go on the computer. Move the mouse down to the word Applications and click once.


In the Applications folder, find and double click on the icon for CanoScan Toolbox 5.0.


The software has a small strip of icons to help you decide what you want to do with the image on the scanner. Click the Save icon. 


A new window will open up. Make sure to type a file name for the image. It is in the middle of the image above and is labeled C3-BCasa. It is a good idea to have a pattern for naming the files. For example Toni is using a patter like this: PasoBCap8pg32 and it means Paso a Paso book B, Chapter 8, page 32. It will make it easier to find the images when you want to display them on the computer.


There should be a check mark on the Display the Scanner Driver option. This will give you the ability to preview and adjust the image before you scan it. 

Small View of Preview Screen


When the preview window opens, the Advanced Options tab should be selected.


Click the blue Preview button at the bottom right side of the window. The scanner will scan the image and place it on the screen. 


Move the pointer along the edge of the image to the dotted line. When the image changes to a two headed arrow, hold the mouse button down and drag until the dotted line is close to the edge of the image. Do this for all four sides of the image. If the pointer is a four headed arrow, holding and moving the mouse will cause the selected area to shift around.


When you are satisfied with the selected area, click the Save button. There will be a message that the scanning is in progress. Do not open the lid of the scanner until this message goes away. The scanner will rescan the image and save the file. By default, the images are saved in the Pictures > Toolbox > date folder. During software setup, I will assist you in creating a Transparencies folder in the Documents folder. 


To find the images, move the mouse to the dock and click on the Documents folder, then click on the Transparencies folder to see all the files.


Rotating and Resaving the Image
After scanning all of the images, you should go to the folder that contains the images and make sure they are all in a proper orientation. They may be sideways. Open the Transparencies folder on the dock.


Double click the images one at a time. If the image is sideways in the Preview program, click Image then click Rotate Left. Choose Preview then Quit Preview and click the Save button to save the newly rotated image. Continue in this manner until all images are rotated.


Renaming Files
If you forgot to choose a name for an image, you can rename the file. Click once on the file name, pause a moment, and click the file name again. The computer will allow you to edit and change the file name. Press the return key to lock in the new name after you type it.


Deleting Files
If you scanned an image twice and have a duplicate file name, move the mouse to the duplicate file, hold the mouse button down and drag the file to the trash can on the dock.

Monday, May 10, 2010

Connecting to Wireless Internet

The MacBook can be programmed to remember different wireless routers. A wireless router will allow the computer to connect to the Internet without a cable.

Connecting At School
The wireless routers that Apple produces are called "airports". In the school building, I have named airports: Shannon, Dallas, SeaTac, Miami, and LaGuardia. There are four wireless routers available for the Windows tablets in the building. We won them as part of the CDWG/Discover prize package. They are named Discovery1, Discovery2, Discovery3, and Discovery4. All nine routers have passwords. The passwords are four characters for the Apple airports because it allows our older iMacs to connect to the Internet. The Discovery routers are ten characters. I have programmed in the airport codes on the MacBooks.


Connecting At Home
To connect to the Internet at home, you must use the icon at the top of the screen. It looks like the image to the left of this paragraph. The more bars that are dark black on this icon, the stronger the signal you are receiving and the quicker the Internet will respond to you.

When you click on the icon, you will see a list of wireless routers near your current location. If the router has a gray lock symbol. It look like the image to the left of this paragraph. You must know the password for the router in order to connect to it. Other routers are open to the public (such as NETGEAR on the list on the right). You can openly connect to the router. If you have a wireless router at home and it has a lock symbol, you will have to find out who has the password. Some routers, like FIOS, have the password on the router as a label.

Sunday, May 9, 2010

The MacBook, Projector, and Speakers

The first pieces of equipment available for the classroom are the MacBook, the projector, and the speakers. These items will provide the classroom with a wealth of free, engaging resources.

The MacBook and Important Features
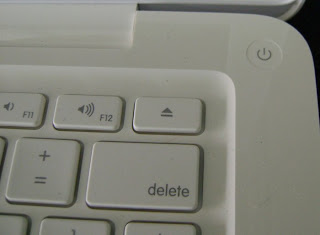
The MacBook's power button is located on the top right side of the machine. Press the power button once to turn on the computer. It takes less than a minute for the screen to light up. Near the power button are the keys labeled F11 and F12. The will allow you to raise and lower the volume on the speakers from the keyboard. To the right of the F12 key is the eject button. If you load a CD or DVD into the machine, this button will eject the disc.


On the left edge of the computer are a series of ports to connect various pieces of equipment. Look at the left edge of the computer from left to right is the port to connect the power supply. Next is the port for an Internet Ethernet cable. This might be needed at home if you have DSL, cable, or FIOS Internet service and you do not have wireless Internet service. To the right of this port is the location to attach the projector cable into the MacBook. Next are two USB ports, one can be used to connect the Promethean Activeboard and one can be used for a mouse or other device. Finally, there is a small circular port for the speakers.

The Projector
The Epson PL 83+ is the projector we are using. It provides a very bright image. So far, it has been easy to use and set up. The projector will stay on the cart with the electrical plug and computer cable attached. In the morning, plug the white MacBook adapter into the Projector Adapter port. The blue projector cable will be plugged into the white projector adapter's wide end. The tiny end plugs into the MacBook.


Next, press the power button once on the top of the projector to turn the bulb on. It takes less than a minute for the projector bulb to warm up and show a crisp, clear image. The Power light will flash while it warms up and then will be a steady green light. In front of the Power button is a sliding door. Use this door to temporarily "mute" the bulb. This is useful when you do not want to show the computer screen during class or during prep periods.  


To turn the projector off, press the Power button once. You will see a message on the screen asking you to press the Power button a second time to confirm that you really want to turn off the projector's bulb.


The Speakers
The speakers for the system are the JBL Duet 2.0 speakers. They provide excellent sound for movies, guest speakers via computer, educational games, and Promethean's ActivInspire software. The volume can be controlled in two ways: via the knob on the front of the speaker and via the F11 and F12 function keys at the top of the keyboard near the computer's power button.


If the volume is too low, make sure the F12  key is pressed until the computer is producing maximum volume. From there, you can use the silver knob on the speaker (to the left in the image) to make sure the speakers are also set to full volume.


The Mouse Track Pad
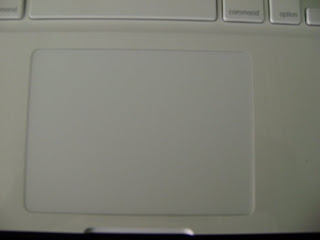
The MacBook has a mouse track pad below the keyboard. It will take a little time to get used to this feature. If you are uncomfortable with the track pad, you can use one of the mice from a computer in your class and plug it into the USB port on the left side of the computer.


The entire rectangle is available to slide your finger. Wherever you slide your finger, you will see the mouse pointer move on the screen.

To "click the left mouse button", press the bottom the the rectangle. To "double click", tap the bottom of the track pad's rectangle twice. To "right click the mouse", hold down the control key on the keyboard and press the bottom of the track pad rectangle. It takes a little getting used to, but soon you will feel confident.


One interesting feature is the ability to "pinch" and "pull" the screen to zoom in and out. To zoom in, take your thumb and pointer finger, place them on the track pad surface and separate your fingers. To zoom out, place your thumb and pointer finger on the track pad spread out a bit and make a pinching motion on the track pad. I found this out the hard way. I got the screen to zoom in by mistake and didn't know what I did. Through experience with this feature on the iTouch, I decided to try the pinch and pull motions and they worked. The track pad is what is known as "multi touch" which allows this new motion.

Thursday, May 6, 2010

Turning on the Computer and Reading a Web Page

The success with the equipment begins with being able to operate the machine with confidence.


Turn On the Computer and Read a Web Page
The Apple MacBook has a power button in the upper right corner of the screen. Press the button once to turn on the power. When the power is on, there is a strip of images at the bottom of the screen. Those are computer programs. 

The mouse is the entire rectangular area below the keyboard. Slide your finger around the rectangle to move the mouse pointer. Tap the bottom-most part of the rectangle once to click the mouse. Tap the bottom-most part of the rectangle twice to double click the mouse.

The icon for Safari starts the Internet. This blog is on a web page. On the top of the screen is a menu. To find this web site, you were taught to click Bookmarks then move the mouse down to Bookmarks Bar then move the mouse to the right to highlight Help Me To Learn Myself ning.


When you are done reading, move your mouse to the word Safari at the top of the screen next to the black apple. Click Safari once. Move the mouse down to the words Quit Safari and click the mouse.


Turn Off the Computer
Press the power button once. Click the Shut down button. Close the lid. You can charge the computer at any time by attaching the power cord's small magnetic rectangle into the back left side of the case.